Add Job Posting
AJL provides the ability for creating self-service and staff-assisted job postings. Employers may request job center assistance by selecting the staff-assisted option when creating a job posting. The employer cannot change this selection after the job posting is created, but they can view, edit, and close the job posting at any time. Job center staff cannot create self-service job postings, but they may be able to view or edit self-service job postings created by the employer depending on their security level. All job postings created by job center staff are automatically designated as staff-assisted.
Navigation
Bring the employer into context by conducting an Employer Search or selecting the employer from My Employers. If your search returns multiple accounts for the same employer, use the staff-assisted account if one exists; however, if your search returns only one account for the employer, you may use it to create job postings regardless of whether the account is labeled as Self-Service or Staff-Assisted. Use the employer context menu to navigate to Employer Details, then click Active Jobs on the Employer Details page.
Add New Job Posting
- From the Employer Details page, click the Active Jobs link. The Active Job Postings for: [Company] page displays.
- If the employer does not have any job orders or if this is a completely new job order, click Post a New Job. The Post a Job page displays.
- All job postings created by job center staff are automatically designated as staff-assisted.
- Creating a job posting is a six step process. Step 1 is Post a Job.
 Answer all of the required questions. Some information is optional. However, the more information you provide, the more attractive the job posting will be to job seekers. It will also help AJL provide the employer with better automatic resume matches. The following list (see drop-down) is a description of fields on the Post a Job page.
- What is the job title? Text; Type the job title. A drop-down list may display as you type to help you refine your job title. A more specific job title will result in better resume matches. You may select a suggestion from the drop-down or continue typing.
- What date do you want this job made public? Text/Calendar; Select the date for the job posting to be made public; defaults to the current date.
- What is the expiration date of this job? Text/Calendar; Select the date for the job posting to expire; defaults to 30 days in the future.
- How many positions are available? Text; type the number of positions available for this job. If the number exceeds 99, contact your local workforce center.
- How many years of experience are required for this job? [Years and Months] Text/Arrows; Type the years and months of experience required for the job or use the up and down arrows to set the years and months.
- What education level is required for this position? Drop-down; Select the education level required for this position. If you select Some High School or Less or High School Diploma or Equivalent, you may also select the required minimum educational functioning level. To learn more about educational functioning levels, click the EFL Descriptions link. Select from the following options (see drop-down):
- Some High School or less
- High School Diploma or Equivalent
- Vocational Certificate or Credential
- Some College
- Associate's Degree
- Bachelor's Degree
- Master's Degree
- Ph.D
- MD, OD, or Related
- DDS, DMD, or Related
- JD
- Other Professional Degree
- Is this position an Internship/Externship? Drop-down; Select Yes or No.
- Shifts: List; Select all that apply from the following options (Hold the Ctrl key to select multiple; see drop-down):
- Day Shift
- Evening Shift
- Night Shift
- Rotating Shift
- Split Shift
- Multiple Shifts Available
- Are there other shift schedules for this job? Text; Describe any details about shifts; click Check Spelling to check your spelling.
- Is this job part-time or full-time? Drop-down; Select from the following options (see drop-down):
- Full-time
- Part-time
- Full-time or part-time
- See job description
- Is this job temporary or permanent? Drop-down; Select from the following options (see drop-down):
- Permanent
- Temporary
- Both
- See job description
- Average hours per week: Text; Enter the average number of hours per week for the job posting.
- Is overtime available for this job? Drop-down; Select from the following options (see drop-down):
- No Overtime
- Overtime Available
- Overtime Mandatory
- Is this job an Affirmative Action job? Drop-down; Select Yes or No.
- Is this a green job? Drop-down; Select Yes or No.
- Is this job supporting H-1B, H-2A, or H-2B Recruitment Activities? Drop-down; Select from the following options (see drop-down):
- No
- H-1B Recruitment
- H-2A Recruitment
- H-2B Recruitment
- Is there a formal program for training new employees? Drop-down; Select Yes or No.
- Is your company a Registered Apprenticeship sponsor? Drop-down; Select Yes or No. A Registered Apprenticeship program must be approved and registered with the state.
- Please enter the Apprenticeship Registration Number: Text; Enter number provided by the DOL or state office for apprenticeships. Required if the answer to Registered Apprenticeship is Yes.
- Is travel required for this job? Drop-down; Select Yes or No.
- Is driving an essential function of this job? Drop-down; Select Yes or No. If you selected Yes for “Is driving an essential function of this job?” the Driver’s License page displays. Select the type of driver’s license required for this position. If you select Commercial Class A, B, or C, you may also select any driver’s license endorsements that are required and any restrictions that will prevent an applicant from being considered.
- To continue posting the job, click Go to Next Step: Build Job Description. Select the occupation that best matches the job posting.
- Click Cancel Jobto return to the My Active Job Postings page.
- After clicking Go to Next Step: Build Job Description, the job posting saves. if you exit before completing the job posting, it will appear in the employer’s On Hold Job Postings list.
- Step 2 is Build Job Description.
- Answer all of the required questions. Remember, the more information you provide, the more attractive the job posting will be to job seekers. It will also help AJL provide the employer with better automatic resume matches. The following list (see drop-down) is a description of fields on the Job Description page:
- Wage Information: Link; Click to view CareerOneStop state-specific market wage information in a new window to help employers identify reasonable wages for a job posting.
- Do you want to display wage information in this job posting? Drop-down; Select Yes or No.
- Minimum starting wage or salary: Text; Enter the minimum wages.
- Maximum starting wage or salary: Text; Enter the maximum wages.
- Salary Other Explanation: Text; If you select “Other” for “How are wages paid for this position”, you do not have to provide the minimum and maximum starting wage or salary, but you do have to provide an explanation in the “Salary other explanation” box.
- What is the job description? Text; Enter your job description in the text box or upload a Word or Open Office document file. The document file will be parsed and saved as text to facilitate job matching. An uploaded document file will overwrite any text entered in this field.
- Select a Job Description to Upload: Button; Click Choose File to select a Word doc or Open Office doc to upload for the job description.
- Find Credentials: Link; Click to view CareerOneStop licenses relevant to your state and the occupation associated with the job posting. For more information, click a license name. When you are finished, return to AJL.
- Are specific credentials required for this job? If so, please list them here: Text; If desired, enter license information from CareerOneStop in the “Are specific credentials required for this job?” text box.
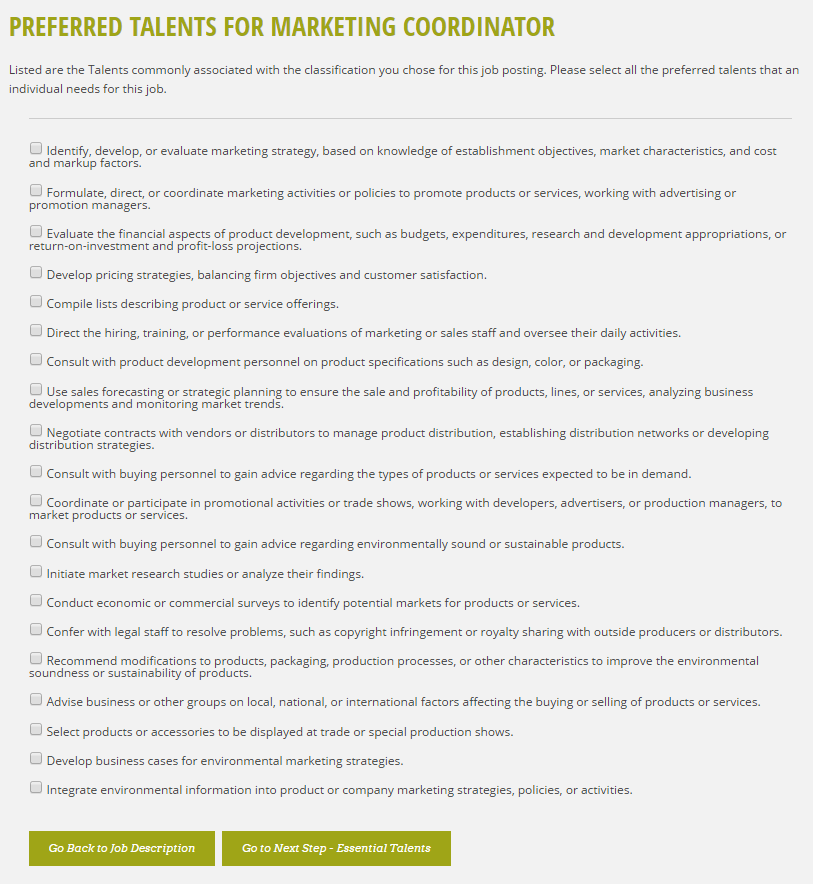
- Tasks: Review the list of Preferred Talents commonly associated with the occupation you selected for this job posting. Select all of the preferred talents an individual needs to perform this job. When you are finished, click Go to Next Step – Essential Tasks.
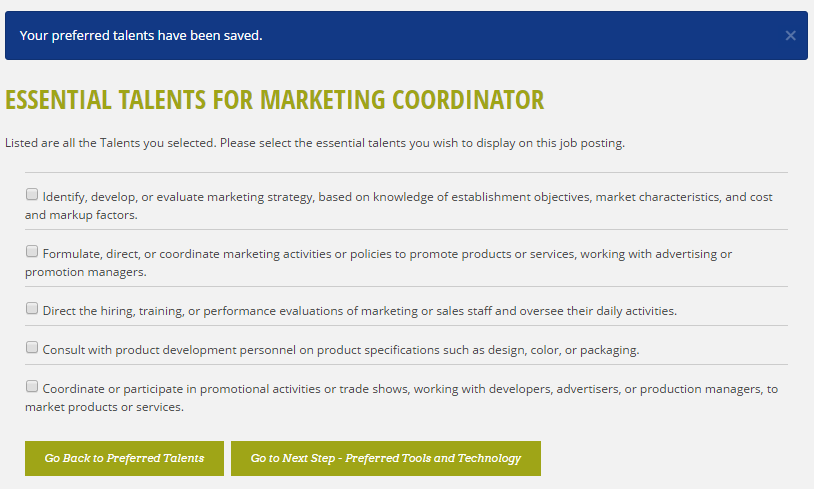
- From the list of preferred talents you selected, now select the Essential Talents you want to display on the job posting. Talents that you do not identify as essential will not display on the job posting. However, all of the talents you selected will be added to a combined job skills list to help American Job Center staff identify employer needs. When you are finished, click Go to Next Step – Preferred Tools and Technology.
- Tools and Technologies: Review the list of tools and technologies commonly associated with the occupation you selected for this job posting. Select all of the preferred tools and technologies an individual needs experience with for this job. When you are finished, click Go to Next Step – Essential Tools and Technology.
- From the list of preferred tools and technologies you selected, now select the essential tools and technologies you want to display on the job posting. Tools and technologies that you do not identify as essential will not display on the job posting. However, all of the tools and technologies you selected will be added to a combined job skills list to help American Job Center staff identify employer needs. When you are finished, click Go to Next Step – Preferred Work Activities.
- Work Activities:Review the list of work activities commonly associated with the occupation you selected for this job posting. Select all of the preferred work activities an individual needs experience in for this job. When you are finished, click Go to Next Step – Essential Work Activities.
- From the list of work activities you selected, now select the essential work activities you want to display on the job posting. Work activities that you do not identify as essential will not display on the job posting. However, all of the work activities you selected will be added to a combined job skills list to help American Job Center staff identify employer needs. When you are finished, click Go to Next Step – Job Location.
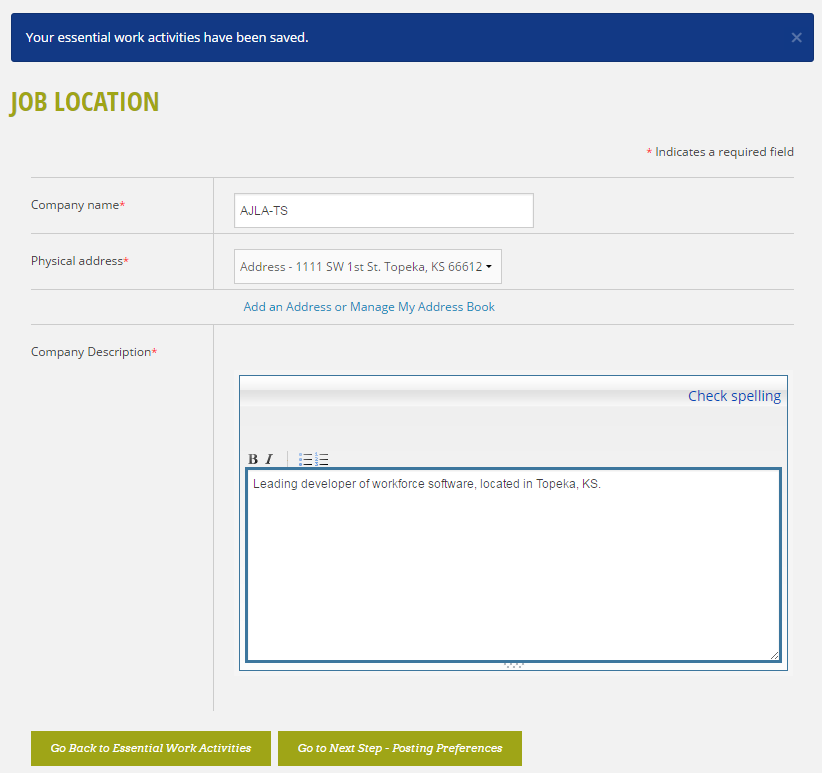
- Step 3 is Job Location.
- Answer all of the required questions. The following list (see drop-down) is a description of fields on the Job Location page:
- Company Name: Text; Defaults to the company name on the employer account.
- Physical Address: Drop-down; Select the location of this job from the Physical address drop-down.
- If the address is not listed, click Add an Address or Manage My Address Book.
- If this account is a primary employer account, you can also view, edit, and delete contact information for all of its subordinate employer accounts. If you would like to add contact information for a subordinate, you must do so from the subordinate employer’s company information page.
- Subordinate employer accounts can only see and manage their own contact information in their address book. For more information, see Primary And Subordinate Accounts.
- To add an address or other information, click the appropriate button at the bottom of the page. Type a unique label. Provide, at a minimum, the rest of the required information. Click the Create [Type] button. When you are finished making changes to your address book, click I Have No More to Add.
- Company Description: Text; pre-filled with the information provided during account creation. You can edit it if necessary.
- When you are finished, click Go to Next Step – Posting Preferences.
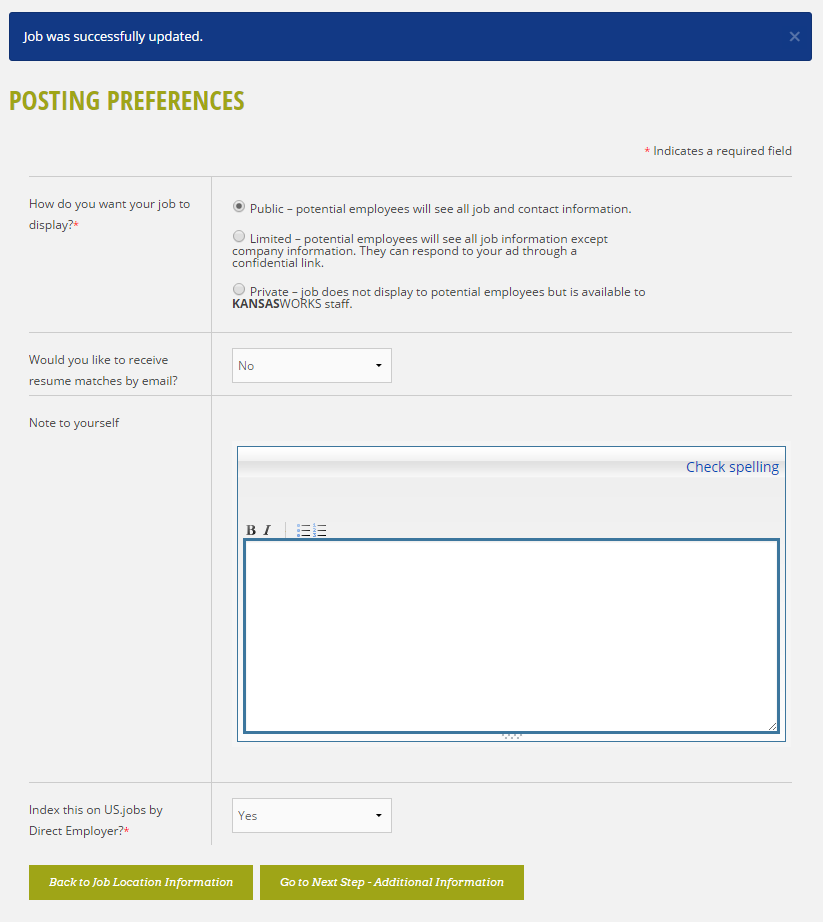
- Step 4 is Posting Preferences.
- Answer all of the required questions. The following list (see drop-down) is a description of fields on the Job Location page:
- How do you want your job to display? Radio buttons; Select from the following:
- Public: Job seekers will see all job and contact information.
- Limited: Job seekers will see all job information except company information. They can respond to the job posting through a confidential link.
- Private: Job does not display to job seekers but is available to workforce staff.
- Would you like to receive resume matches by email? Drop-down; Select Yes or No. The employer must have an email address on file.
- Note to yourself: Text; Type any notes about the job. These notes will not display on the job posting.
- Index this on US.jobs by Direct Employer? Drop-down; Select Yes or No.
- Index this job on America's Job Exchange? Drop-down; Select Yes or No.
- How do you want your job to display? Radio buttons; Select from the following:
- When you are finished, click Go to Next Step - Additional Information.
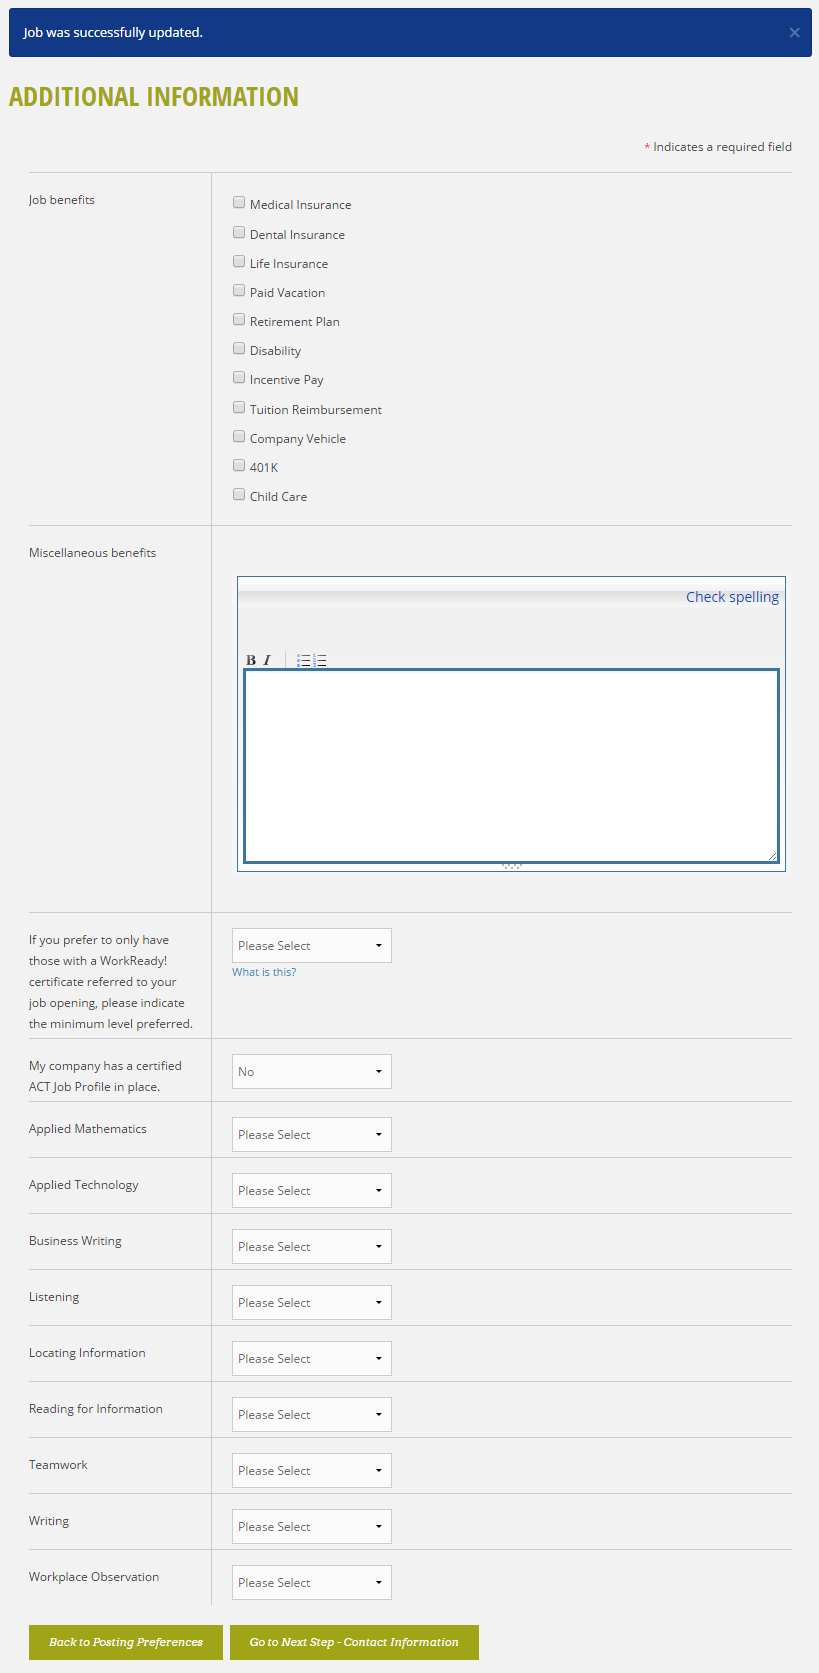
- Step 5 is Additional Information.
- Answer all of the required questions on the Additional Information page. The following list (see drop-down) is a description of fields on the Additional Information page:
- Job Benefits: Check boxes; Check all benefits that are included with the job. Select from the following options:
- Medical Insurance
- Dental Insurance
- Life Insurance
- Paid Vacation
- Retirement Plan
- Disability
- Incentive Pay
- Tuition Reimbursement
- Company Vehicle
- 401K
- Child Care
- Miscellaneous Benefits: Text; Enter any additional benefits not listed above.
- If you prefer to only have those with a WorkReady! certificate referred to your job opening, please indicate the minimum level preferred. Drop-down; Select from the following options:
- Platinum
- Gold
- Silver
- Bronze
- What is This? Link; View additional information about Career Readiness from America's College Testing.
- My company has a certified ACT Job Profile in place. Drop-down; Select Yes or No. For the following specific skills, select the desired skill level from the drop-down list.
- Applied Mathematics
- Applied Technology
- Business Writing
- Listening
- Locating Information
- Reading for Information
- Teamwork
- Writing
- Workplace Observation
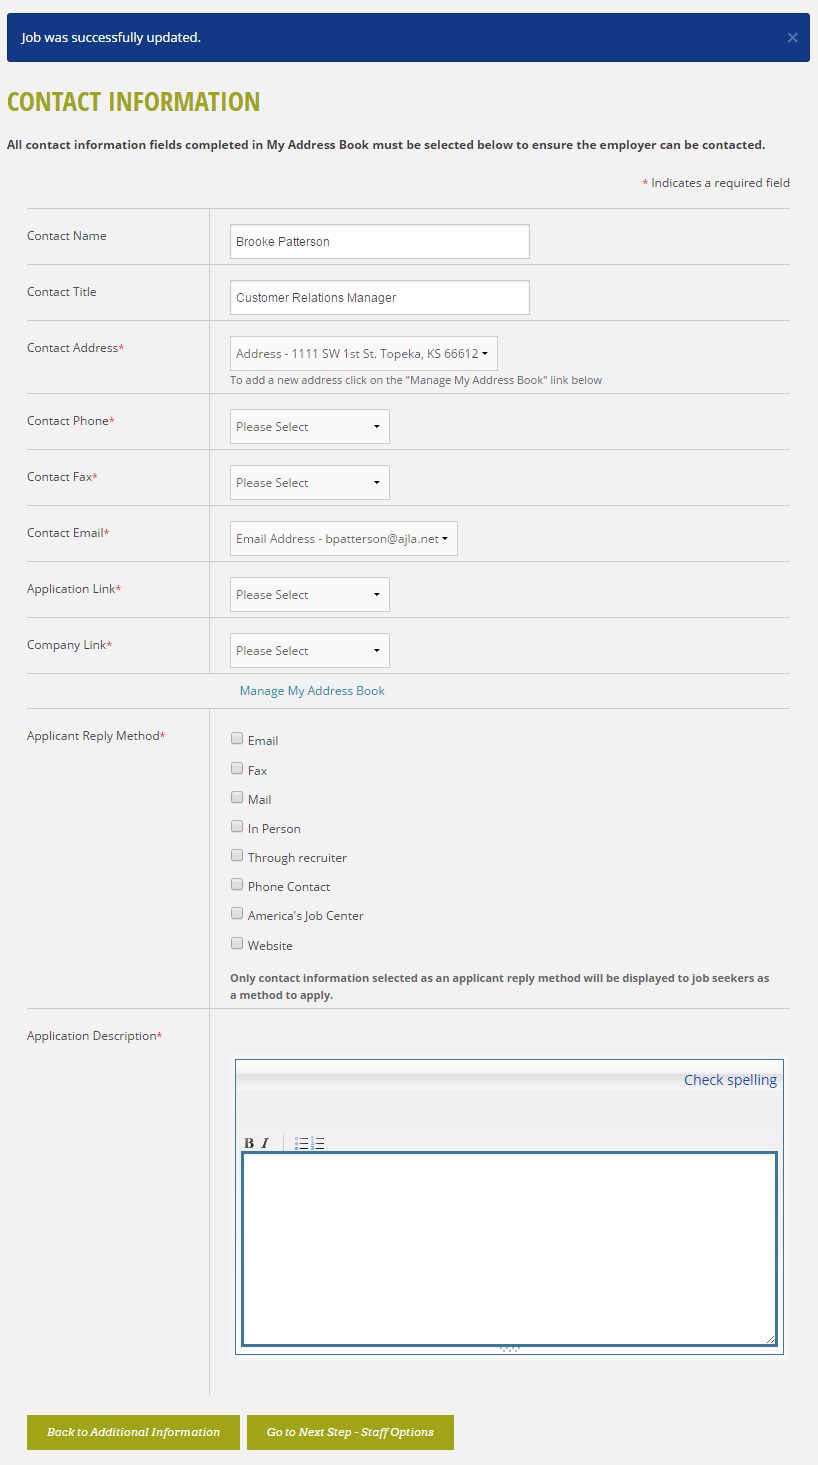
- Click Go to Next Step - Contact Information. The Contact Information page displays. The job posting contact information is pre-filled with the account contact information if available.
- If the contact person for this job is different, type the correct contact name and title or change the selections in the drop-downs.
- If the desired information does not display in the drop-downs, you can add or edit the information by clicking Add New Contact Method or Manage My Address Book.
- You must make a selection in each drop-down for which information exists in the employer address book. However, only the contact information that corresponds to the reply methods you select will display on the job posting.
- Applicant Reply Method: Check boxes; Select how the employer would like to be contacted by job applicants from the following options (see drop-down). You may select more than one option. If you select America’s Job Center, the contact information of the American Job Center to which the employer’s ZIP code is assigned will display on the job posting.
- Fax
- In Person
- Through recruiter
- Phone Contact
- America's Job Center
- Website
- Application Description:Text; Provide any additional information about the application process.
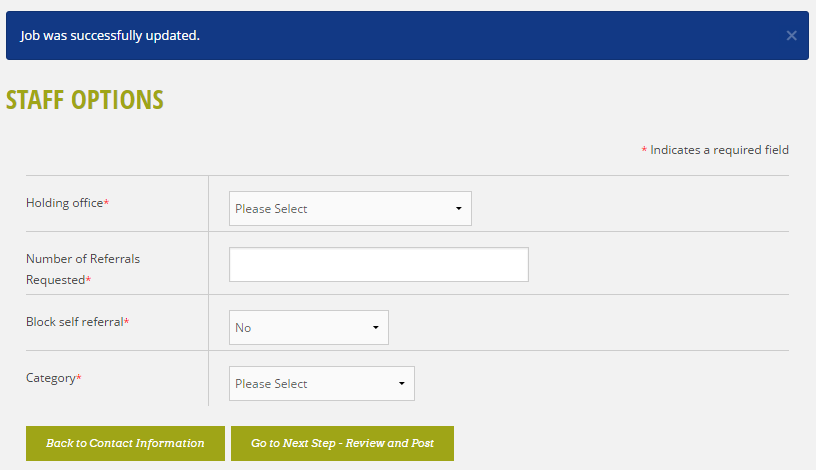
- Click Go to Next Step - Staff Options. The Staff Options page displays. Answer all of the required questions on the Staff Options page. The following list (see drop-down) is a description of fields on the Staff Options page:
- Holding Office: Drop-down; Select a holding office for the job posting. Once established, the holding office cannot be changed. Staff from other offices cannot edit the number of positions or the number of referrals requested on the job posting.
- Number of Referrals Requested: Text; Type the number of referrals the employer would like to receive. For staff-assisted job postings, the number of referrals defaults to zero.
- Block Self-Referral: Drop-down; Select Yes or No. This option only applies to job postings with the disclosure level set to Limited. If you select No, a “Request Referral” button will display to job seekers on the Job Details page. Job center staff manage self-referrals using the Self-Referral Approval queue.
- Category: Drop-down; Select the job category.
- Click Go to Next Step - Review and Post.
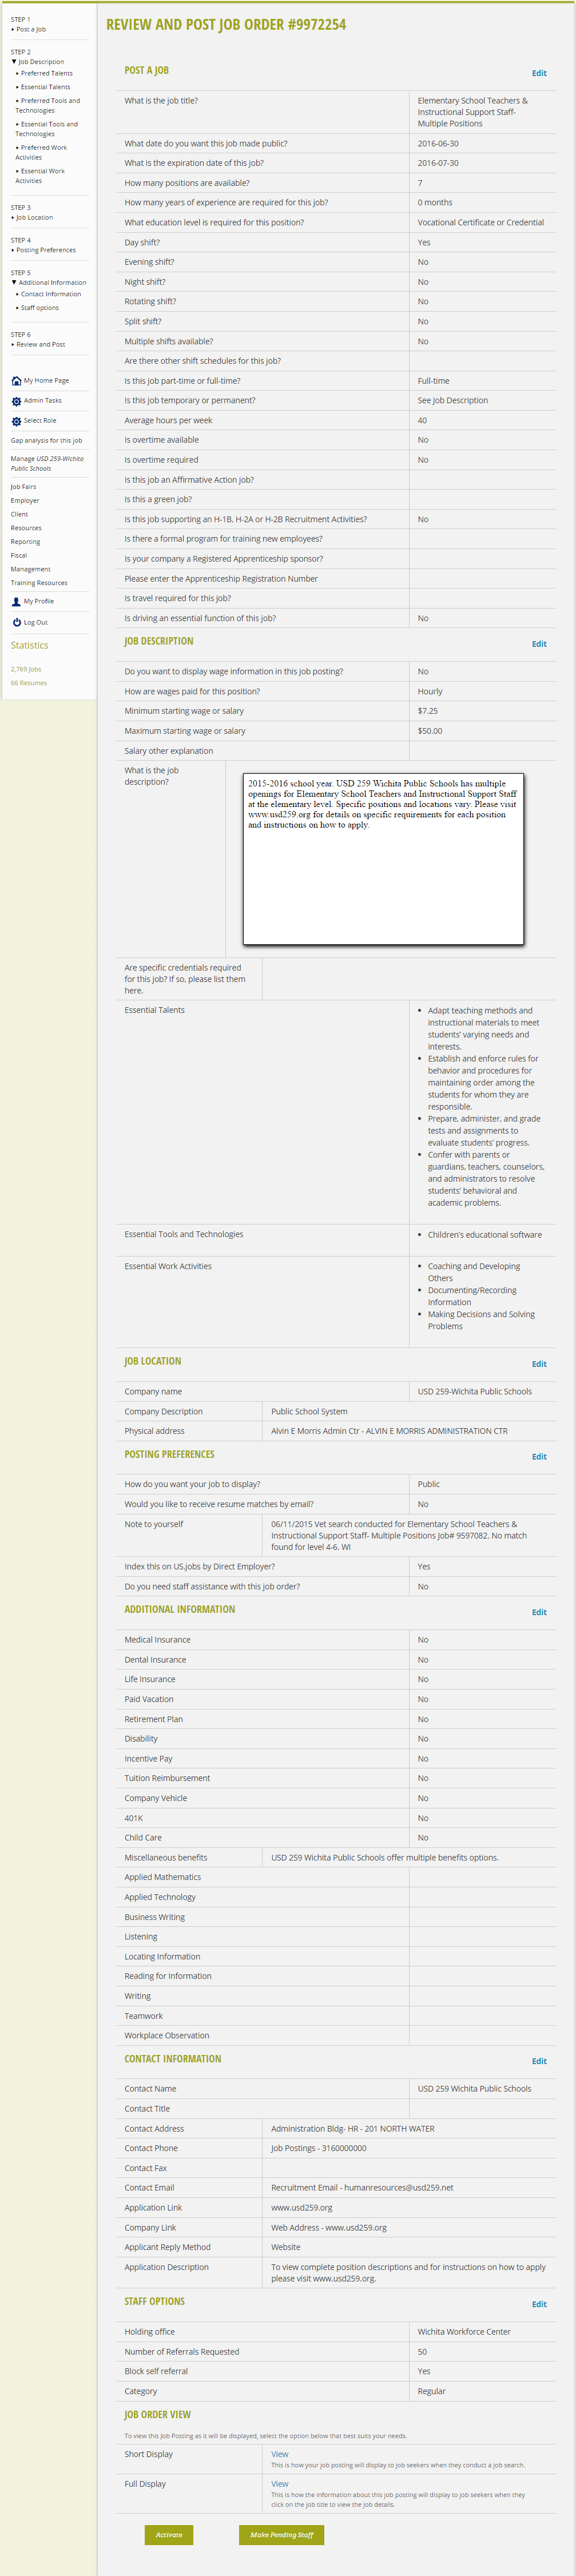
- Step 6 is Review and Post. Carefully review all of the information you provided. To make any changes, click the Edit link at the top of the appropriate section.
- Job Order View: Click the View to preview the job posting.
- Search Results Display is a preview of how the job posting will display to job seekers when they conduct a job search.
- Short Display is a preview of how the job order will display to public who have not logged in to AJL.
- Full Display is a preview of what will display to job seekers when they click on the job title to view the job details.
- When you are satisfied with the accuracy and completeness of the job posting, at the bottom of the Review and Post page, click Activate. If you click Make Pending Staff, the job will be placed on hold and will not be available in public searches on its posting date until a staff member activates the posting.
- Job Order View: Click the View to preview the job posting.
- After clicking Activate, a confirmation message displays. On the posting date, the job will now be published to the JobLink search engine and visible to job seekers depending on its disclosure level. The job order now appears in the employer’s Active Job Postings list. The job has also been automatically added to your My Job Orders page for convenient follow-up.
- Jobs are published according to the set veteran's priority in each state. For most states, jobs are viewable by veterans on the publication date, by other eligibles on the next day, and to all job seekers on the third day.
![Active Job Postings for: [Company]](../../Resources/Images/D_Employers/EmployerDetails/ActiveJobNoPostings.png)
Quick Start Guide
Click to view full-screen video in new tab: Creating a Staff-Assisted Job Posting
Create Similar Post
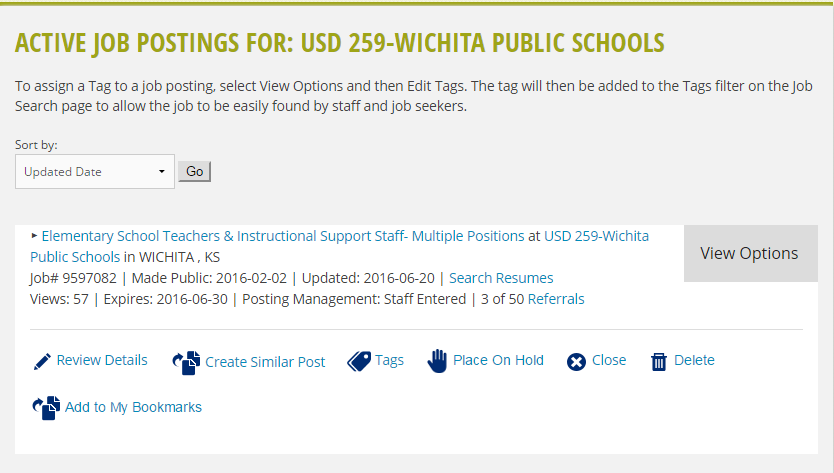
- Create Similar Post allows a job posting to be duplicated and can be used to quickly generate new job postings from existing job orders. From the Employer Details page, identify the job status of the posting you desire to duplicate. Active, pending completion, on hold, referred, and closed jobs can be duplicated. In this example, an active job is being duplicated.
- From the Active Job Postings list, identify the desired posting and click View Options. Click Create Similar Post. The Review and Post Job Order page displays.
- Review the content of the job posting. Click the Edit link at the top of any section to make changes, or in the left-hand menu, click the area of the posting that needs to be updated.
- Note that the publishing date is set to the current day, with the expiration date set to 30 days in the future. Edit if necessary.
- When you are satisfied that the details of the job posting are correct, click Activate to make the job posting active on its publishing date, or click Make Pending Staff to send to the Pending Staff Approval queue.